CCD Cameras - A Quantum Leap for Amateur Astronomy
Story
© Copyright 1998 Paul Mayo
Like a fisherman who strives to catch bigger and better quality fish, for sometime I wondered how I could create better astrophotographs of celestial objects with my telescope and photographic film.
My existing astrophotography equipment consisted of a 200mm f/6 Newtonian telescope on an equatorial mount, and a simple 35mm SLR camera. For many years I quite happily produced lovely astronomy images, having tried all sorts of different films, including hyper-sensitised film, and even took many photographs using large camera lenses piggybacked on the main telescope. After 7 years under the night skies and hundreds of rolls of film later, I found myself becoming a little bored since I had photographed most of the large and popular dark-sky objects that were within the reach of my relatively small telescope.
For sometime I thought about how to create better images but the choices seemed limited to, a larger telescope, perhaps a large-format professional camera. I also considered a CCD camera as another option but the purchase price of such devices were quite expensive, and CCDs didn’t seem to produce the aesthetically pleasing images that color film does so well. A larger telescope seemed the most obvious solution as it would give me more light gathering power, bigger image scale and allow for shorter film exposures. Though to replace the telescope optics would also incur replacing my trusty equatorial mount, drive motor, hand-controller, and guidescope bracketing system equating to a huge cash outlay and making my entire collection of current equipment redundant.
Hyper-sensitised film was another good option, though the availability of ready-to-go hypered film wasn’t easy to get and at times non-existent in Australia. Though I could have purchased my own film hyper-sensitisation kit from overseas, I found that to purchase the gas needed for the hypering tank could prove difficult to get in Australia because of certain laws restricting it’s supply to the public. Moreover the required gas could only be supplied in excessively large gas bottles. Hypering film is its own science too, so it could be a rather time consuming task to work out what hypering recipes to use on which films.
There were few options to choose from options unless I could win the lottery and afford a sizeable cash outlay to replace just about all of my telescope equipment and start-over again. I didn't really want to replace the whole 'scope and mount anyhow, for fear of portability and storage problems. So reality struck and I had almost resigned myself to thinking that the only way I could greatly improve my astrophotography images would be to save enough money for a sizeable cash outlay for new equipment.
Loitering on the Internet one night I came across a number of Internet web sites created by other amateur astronomers who had built their own CCD cameras, a CCD camera known as the "Cookbook CCD Camera". My attraction to these web sites were the stunning images taken with these homebuilt CCD cameras. Amazingly the exposure times that were required to capture the images were very short, some just minutes long unlike the 30 or 60-minutes you would expect when using photographic film. Also I found quotes like "reach magnitude 15 objects with 2 second CCD exposures", and some amateurs were reaching very faint deep sky objects of magnitude 18 with short 5 minute exposures and similar telescopes to that of my own. Even with 45 minute long exposures I could only reach around magnitude 15 objects with my telescope and film, and believe me the success rate of these long guided exposures is quite low.
The thought of myself building a Cookbook CCD camera seemed daunting at the time, but an internet site reported that I did not have to be a rocket scientist to build one of my own. Apparently over 2,500 Cookbook CCD cameras have been built by amateurs around the world, and internet sites are testimony to the number of Cookbook CCDs in use.
Further investigation on the Internet revealed that there was a book published giving step-by-step instructions on exactly how to build the CCD camera. The book is titled "The CCD Camera Cookbook" by Richard Berry, Veikko Kanto, and John Munger. A quick look through my current issue of Sky & Telescope magazine showed an advertiser who actually listed the book! My excitement flourished, I went back to the Internet, and continued to find out everything I could about this home-built CCD camera, specifically how much it would cost to build and how it compares to other off-the-shelf CCD cameras. Though regardless of the how this CCD camera compared to others at a specification level, the images I’d seen on the web spoke for themselves.
Unlike film, a CCD's sensitivity to light does not degrade over the length of the exposure time like that of photographic film making CCD cameras well suited to imaging faint deep sky objects. For amateur astronomers this is one of the major attractions to CCD cameras along with the fact that each CCD image is stored digitally from which accurate position and magnitude measurements can be produced. Not to mention the potential savings in film and development costs.
Upon receiving my own copy of the Cookbook CCD Camera book and after a quick read through I had a good idea of what had to be done to build my own CCD camera. Basically I would need to purchase a list of electronic components, sharpen my soldering iron skills, get creative with a hammer and saw, and search the garage and local hardware shop for bits and pieces. Being an amateur astronomer for over two decades and likened to the idea of building my own brackets, telescopes and the like, this was right up my alley.
There are two CCD cameras described in the book, from which you can choose which one you want like to build the CB215 or the CB245. The main difference between the two is that the CB245 has more pixels [pixels are individual elements on the CCD chip that detect light]. I chose to construct the CB245 because as it was only slightly more expensive to build and it would offer better images. The CCD most commonly produces 378x342 and 252x242 pixel size images, though a number of other image sizes are available each having varying sensitivity to light.
The CookBook CCD camera system is based around a thermo-electrically cooled CCD chip mounted in an air-tight polished aluminum housing that fits into the draw tube of your telescope. Since the amount of electrical noise that a CCD produces is directly related to temperature the electronic cooling device can chill the CCD to as low as –35degC which dramatically reduces the amount of noise that can be seen in a CCD image. Most importantly the CCD temperature is stabilised by pumping water through the CCD housing from a water coolant tank which removes waste heat from the CCD camera body. It turns out this is easier than it sounds, and is a far more effective method than CCD cameras that are air-cooled.
The CCD camera is operated by using a IBM compatible computer that has a VGA screen and the software supplied with the book. The book suggest the software will work on any computer that has a parallel printer port and a CGA or EGA screen, though a VGA screen is recommended. Originally I used a very old 80286-AT computer with a monochrome screen and the software worked fine. I’ve found the software also works fine on the latest Windows based Pentium computers. So the type of computer you need to run the CCD camera is the type of computer that most people are throwing away these days or selling for a basement level price. I eventually decided to purchase an old 486 laptop for a few hundred dollars, which is a little more convenient to use in the field, than a desktop computer.
The book tells you everything you need to know about how the CCD camera works and how to build it, the book is also accompanied with a software program that helps you build the CCD circuit boards. The software prompts you to solder various components on the circuit boards, it then draws the circuit board on the computer screen and prompts you through measurement tests with a multi-meter to make sure each stage of completion works. Additionally the book is supplied with another software program that controls the CCD, takes the images, and does image processing.
Using my computer and a spreadsheet program I created a list of all the components I would need to build the complete CCD camera. Initially I contacted University Optics in the U.S. for a price list of the Cookbook CCD components that they stocked. While I could have purchased all of the electronic components from overseas, I instead decided to purchase as many items as possible locally, as this would hopefully cost less than importing the components. As I found, most of the electronic components could be purchased from local electronic component suppliers, such as Dick Smiths. A copy of their catalog came in real handy. Some of the main components, such as the CCD chip and circuit boards, could only be purchased from University Options in the United States. They also sell the aluminum CCD camera body and a few other hard to find components, and optional accessories for the CCD camera such as an adapter to mount your 35mm camera lenses on your CCD.
The only difficulty in sourcing parts were the transformers to be used in construction of the CCD power supply unit. The book described transformers that worked from 120-Volts rather than the 240-Volts available here in Australia. Fortunately Dick Smiths were able to supply 240VAC transformers that produced the required output voltages.
With most prices collected, it appeared the whole project would cost around 1200-dollars, which was quite a bit cheaper than imported CCD cameras and much cheaper than replacing my whole telescope and mount for something bigger. Convinced that building my own Cookbook CCD camera was indeed the new astronomical direction that I would pursue, I engaged in purchasing everything required.
About six weeks later I had received all of the components I needed to begin construction. Since I was no electronics expert I made myself an up-front promise that I would take my time and do everything precisely as described in the book and in the instructional software.
The first component to be built required me to build a timber box that would become the power supply box. The power supply provides power for the CCD camera, the CCD electric cooling device and the coolant pump. The coolant pump is used to pump water from a coolant container, like a bucket of water, up through some vinyl tubing and through the CCD camera body, then out and back down to the coolant tank. Building the power supply unit deals with dangerous 240Volts that certainly had me concerned, though fuses are used for protection, and the power supply worked properly the first time I turned it on.
The next component to construct was called the Interface Card, eventually housed in a small aluminum box the Interface Card essentially connects your computer to the CCD camera via the computer’s parallel printer port. Making the interface card involved following the instructions given by the supplied software and soldering components to the ready made Cookbook CCD circuit board, and then testing various stages of completion usually with a multi-meter. Though this was a little fiddly handling small electronic components and carefully soldering them to the circuit board, everything tested okay and the circuit passed all of it’s tests.
The next circuit board to be built was called the Pre-Amplifier Card. This circuit amplifies the signals from the CCD camera and sends them to the Interface Card where they are then transmitted to the computer. After the completion of the final circuit board, I came to the next and most exciting stage of construction and that was putting together the CCD camera body. The CCD camera body houses the CCD chip behind an optical glass window. The CCD chip sits on the electronic cooling device, used to cool the chip to sub-zero temperatures. This stage of construction was almost akin to brain surgery as it involved soldering fine wires from the CCD chip socket, however I took my time and worked carefully.
Finally the last component to construct was the coolant tank and pump system. This involves finding a container of some type, a large bucket would do, and cutting two lengths of vinyl tubing to carry the water from the tank to the CCD camera body. The book recommends using a car windscreen washer pump to pump the coolant from the bucket up through the vinyl tubing to the CCD camera and back down through a second vinyl tube. However I was already aware from research on the Internet, that these types of pumps were not very successful and tended to cease working. So I decided to purchase a bilge-pump from a marine parts supplier, though later I found that a sub-mercible fountain pump is probably a better option. The pump is only required to pump a trickle of water through the tube, around 250ml per minute.
The entire construction took around 70-hours over a period of two months and cost about 1250-dollars (AUS) to build.
The moment of truth came with the first night under the stars with my homemade CCD camera and telescope. The CCD software set into Find mode, which means the CCD repeatedly takes short exposures and updates the computer screen every few seconds with the latest image. I turned the CCD on, suddenly there were stars appearing on the computer screen, the CCD camera was working! This was only the second time I ever jumped around my backyard in the dark, the first time was to do with spiders but that’s another story!
Total disorientation took place, because there were so may stars appearing on the computer screen, the computer screen was being updated with a new image every 2.5 seconds, since the exposure time was set to the default 1.5 seconds. I moved the ‘scope to point it to a more familiar object in the sky and to my surprise stars streaked across my computer screen. I suddenly released that I could move the telescope and look at the computer screen to see where I was pointing. I was still puzzled as to why I was seeing so many stars then I released that the CCD images were showing many more stars than I was used to seeing, in-fact it was picking up stars as faint as magnitude 15 with 1.5-second exposure times! By now I was bursting with excitement, the same sort of excited feeling that I experienced as a young child with my first telescope. I found myself filled with renewed astronomical enthusiasm.
Before long I was seeing galaxies appear on my computer screen like I had never seen them before, they appeared in better detail and size than I could have obtained using my film camera. The CCD camera had changed the image scale of deep sky objects. Since the CCD chip is much smaller than a 35mm film negative, objects appear larger on the CCD images, but the field of view that the CCD sees is much smaller than that of film. The well-known spiral galaxy, NGC253, filled the computer screen from side to side it stood out like the Zeppelin, whereas on film the galaxy appeared only as a relatively tiny portion of the photographic print.
During the weeks that followed I began taking images that showed galaxies in Fornax that were as faint as magnitude 18.36 with a 4-minute CCD exposure, or integration as they as called in the CCD world. With such faint objects appearing on my CCD images this presented a new challenge; my existing atlases didn’t show many of the faint galaxies that could be seen in my CCD images. Such light gathering power in such short exposure times had exceeded all of my expectations. Using the Find/Focus mode of the CCD camera I could move the telescope through the Fornax galaxy cluster and literally see galaxies floating across my computer screen.
A CCD image I took of the famous Sombrero Hat galaxy (Messier 104) showed globular star clusters floating around the galactic halo. No longer was I stuck to imaging the types of objects that were within the range of my 200mm telescope, I found myself now able to image objects as faint magnitude 18.5 so a whole new universe was suddenly within my grasp. There were more new horizons now within reality too, since there are software programs available that allow precise photometric measurements to be made from the CCD images. This allows you to produce accurate magnitude and positional measurements from the images. There is also software available to "blink" images, a great way to search for supernovae in galaxies by the taking CCD images of the same galaxy on different nights a then the software alternately displays each image making any new supernovae appear to blink on and off.
The CCD Camera Cookbook book tells that using a 6-inch f/5 reflector that Pluto, at magnitude 14.5, is visible on the computer screen with just a 1-second exposure. This is very true, the Cookbook CCD is certainly very sensitive to light, in-fact I found it is so sensitive to light that if I shone my red torch on the ground the feeble light is detected by the CCD as the light bounces off the ground and then travels up the end of the telescope tube past the primary mirror cell. Immediately I proceeded to make an end-cap for the mirror end of the Newtonian telescope to prevent further stray light entering the telescope.
The CCD camera exceeded my expectations because it enables me to image objects that I could only see visually if I had an enormously large telescope
I can certainly say that my homebuilt CCD camera has opened new doors in the world of Astronomy for me. My future now beholds measuring variable star brightness's, searching for new asteroids, producing color CCD images using RGB filters, producing mini-movies of Jupiter and it’s moons in motion, and just imaging all those deep sky objects that were too faint to be revealed by my film exposures. With my conventional film-based astrophotography equipment I remember having to pick the brightest of galaxies to photograph and now with the CCD camera I can image just about any galaxy or deep sky object that appears on any star atlas.
story by Paul Mayo
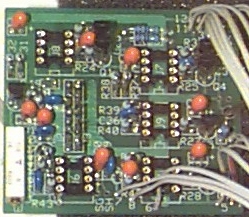
The pre-amplifier card

The computer interface card
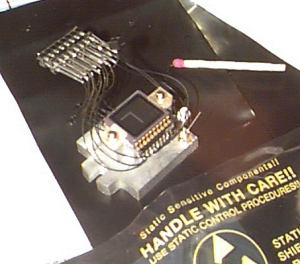
The CCD sensor
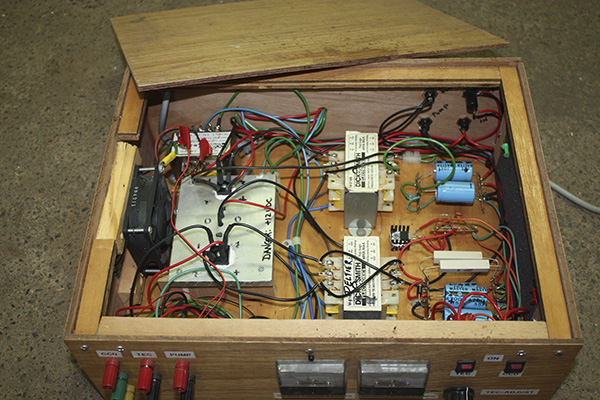
The Power Supply
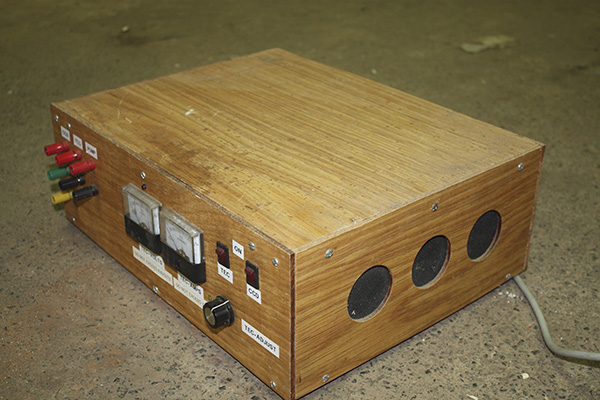
The Power Supply completed
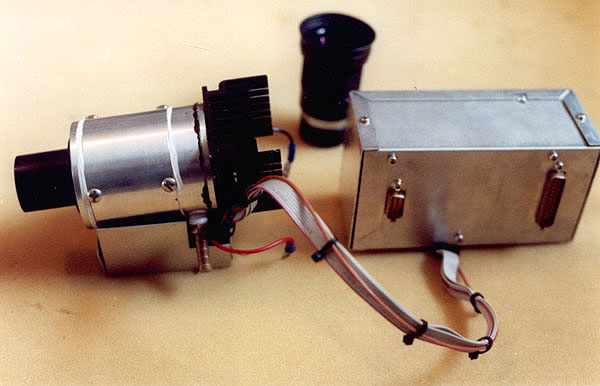
The completed CCD camera
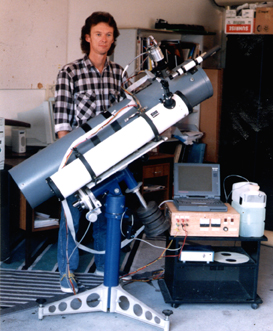
Paul with the CCD camera mounted on the
telescope, home made power supply
and cooling system on table.
(circa 1998)
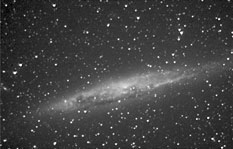
Galaxy NGC4945 in Centaurus
10-minute exposure
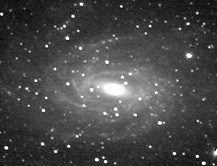
Galaxy NGC6744 in Pavo
20-minute exposure
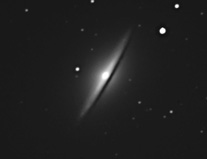
Sombrero Galaxy in Virgo
10-minute exposure